How do I set up my Avicon camera to be “on my network”?
The first thing you are going to want to do to get your camera up and streaming on your network is to connect your camera to power, to an active network port on your network and finally to power the camera on.
Next, download the Upgrade tool (IP address setting tool) https://avicon.cn/en/download.html. This is available for MAC or Windows machines. The program downloads as a ZIP file, so it needs to be un-zipped on your machine before you can run it.
The program uses mDNS for discovery, so if you are using a switch that does not support mDNS, this program may not find your cameras. If this happens, look at the extras section at the end of this guide.
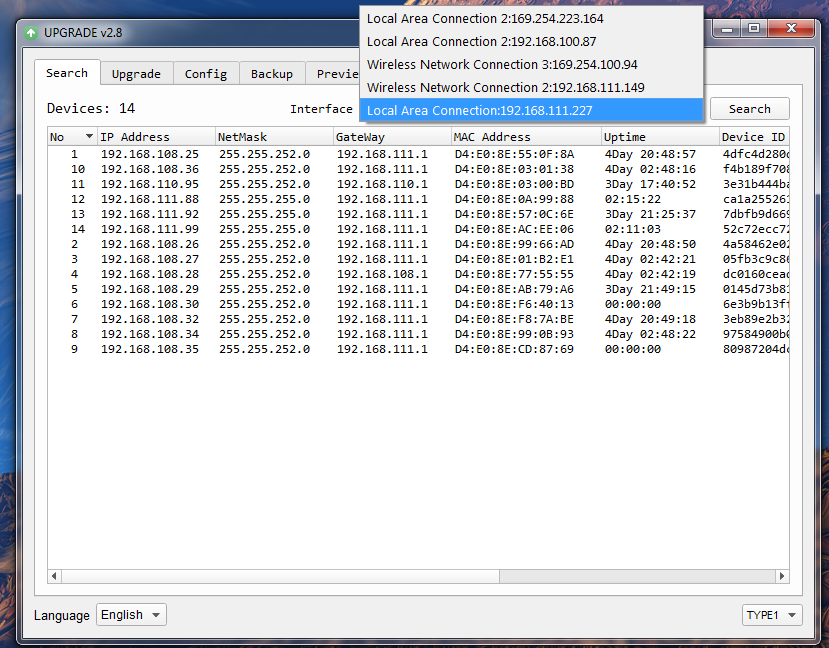
Once you run the program, you should be able to change the “interface” option in the upper right of the search tab. This is letting you select the different NIC (network) ports on your computer. The program does always have some multicast addresses in the interface options as well. If you don’t know which option is your connection to the camera, please take a look at the extras section at the end of this guide to find your IP range, and then select the option that is that range.
The next thing to do is change your camera's IP address to be in the same range as your network. The camera comes with a default static IP address of 192.168.100.88. You will need to update that to be in the same range as your network. This should be the first (3) sets of digits from the interface you are using the find the cameras. Our network is set up to be 192.168.111.xxx. We also have a different Subnet setup with the 192.168.108.xxx so both IP schemes show up with all our cameras on the network. NOTE: if you need to find the IP range of your network, you can do so by following the guide in the extras section at the end of this document.
The camera has numerous IR shortcuts built in to help with this process of finding your camera's IP address and getting it on the network.
Star (*) then Pound (#) then (4) – will show you the current IP configuration across the video output. So you can have the HDMI hooked up to a monitor, it will tell you the IP address the camera currently has.
Pound (#) then Star (*) then (4) Will place the camera into DHCP mode. If you know that this camera is hooked to a DHCP router, you can do this to have the camera finds its won DHCP address. The shortcut above this can then tell you what that IP address is. The camera will reboot after receiving this command.
Star (*) then Pound (#) then (Manual) – This will reset your IP configuration or the camera back its static setting at its static IP address of 192.168.100.88 (PTZ cams) or 192.168.100.99 (Zcams). The camera will reboot after receiving this command.
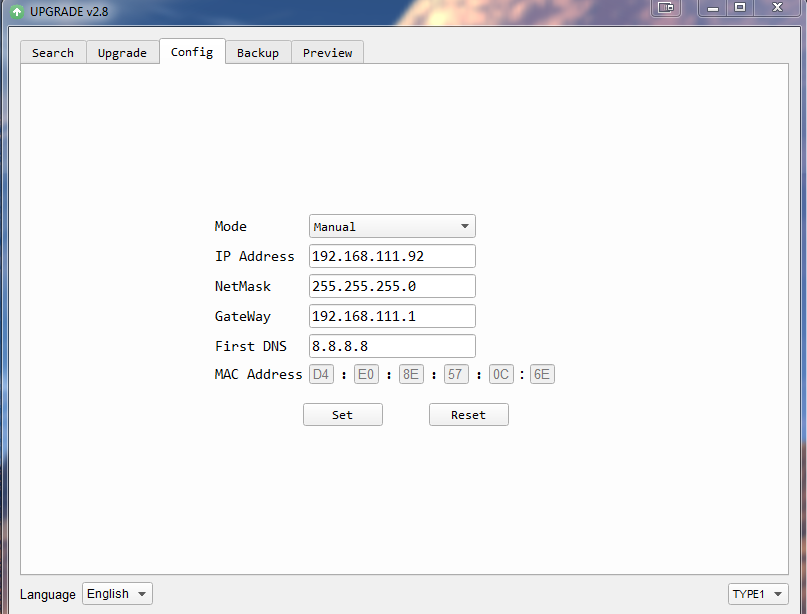
Once you know your IP range you can right-click on the camera you wish to change the IP address for and click “config”. 
You should now be able to set your cameras IP address to one in the range of your network. You should be able to leave the subnet mask alone unless there is a reason for you to change it. The Gateway should be the same as the IP address you used, but .1 instead of the last set of digits in your IP address. So, in my example above, 192.168.111.92 IP address should have 192.168.111.1 as the gateway.
Please note: in more complex network environments you may have to request a “STATIC IP” from the IT department to prevent any possible complications on your network in addition to the appropriate Network Mask, Default Gateway and First DNS for that Static IP
Now that you have set the Static IP address of your Avicon camera, you should be able to pull up the IP interface by typing the IP address into a browser. You will be prompted for a Username and Password, both are “admin” by default.

1. Discovering your Network IP range (WINDOWS).
PLEASE NOTE: Changing your IP address without talking to your network admin could lead to conflicts with your network. If you change your address to one that is already in use it will cause communication problems.
If you need to discover the IP address range of your network you can do so by using command prompt for Windows or Terminal for Macs.
To do this on a PC, you would type “CMD” into your search bar in the Windows menu. You should see a black box pop up with the ability to type in the box.
If you type “ipconfig” and hit “Enter” on your keyboard you will see a bunch of information pop up in your command prompt.
This information is all the various ways your computer has to connect to a network. There is usually a Local area connection one, and then a Wireless one, but sometimes Bluetooth or other ethernet ones. You should be using the ethernet one, or local area connection. In my example below, I only have a wireless network connection, and a wired one and they both have the same IP scheme.

The “Ethernet adapter local area connection” is the one I want to use the IP scheme from because that is the wired
connection to my computer and since the camera is only wired into my network, that has to be where my camera is.
When you see “IPV4 Address” that is your computers IP address on your current network. So you would use the first 3. sets of numbers from this as your IP range
2. Discovering your Network IP range (MAC)
If you need to find the IP range of your MAC computer, you would first open a new finder window and then go to Applications, and then Utilities. You should see the program “Terminal” in that menu, select that program.
Now, you would type in “ipconfig getifaddr en0” Once you type this string and click “Enter” on your keyboard you will receive back an IP address.
So the IP range of my network, according to my MAC is 192.168.111.xxx, you can use this to figure out the IP range in which your camera needs to be set.

3. What do I do if the Upgrade tool cannot find my cameras?
Since the Upgrade tools uses mDNS for discovery, if that is not set up or available on the network, the tool is going to have issues finding the cameras.
There are only (2) ways around this.
You can try and use DHCP mode. If the router in the network has been set up for DHCP you can use the IR shortcut listed above to set the camera to be in DHCP mode, and then use the shortcut to see the current IP address, and you should be good.
The other option would be to set up your computers static IP address to be within range of the default IP address on the camera. The camera ships with an IP address of 192.168.100.88 (ptz cam) or 192.168.100.99 (zcam). Using the IR shortcuts listed previously in this guide, you can reset the camera back to default, then follow the linked guides to set the static IP of your computer to be in the same range (192.168.100.89 is a good one). You can then get into your camera by typing the IP address into a browser and going to the network tab. Here, you can set whatever IP address you wish for the camera, click apply, and then go to the system tab and reboot. Now, be sure to go back to your network settings and change the IP address of your computer back to what it was previously.
Setting static IP address for a PC in windows. -
https://kb.netgear.com/27476/How-to-set-a-static-IP-address-in-Windows
Setting a Static IP address for a MAC -
http://www.macinstruct.com/node/550
Contact: Mr. Yang
Phone: 18576435658
Tel: 0755-85261818
Email: info@avicon.cn
Add: 8/F, Zhishengda building, Longhua District, Shenzhen.